Minimum requirements to connect
In order to connect the Property Manager’s (PM’s) property to Expedia, the following requirements must be met:
- Property name is provided.
-
Property type is selected.
Note: If the Property type is mapped to Aparthotel, Apartment, Condo or Cottage , then the property must have at least one bathroom! - Maximum number of guests value is provided.
- Address and Geo-coordinates are provided.
- Kitchen is available at the property, see Kitchen.
- Number of beds equals the Maximum number of guests.
- Description has at least 700 characters.
-
Photos:
- At least 10 photos are uploaded.
- The minimum width is 1024 px; the minimum height is 768 px.
- Main picture is selected.
- Prices and availability are provided for some seasons.
- Minimum stay value is between 1 and 28 days.
- Payment methods are provided.
- Cancellation Policy is set in a continuous way, which means there are no non-penalty periods between two periods with a penalty.
- Cancellation Policy: If there are multiple cancellation policies, the fee amount must increase (or at least remain on the same level) towards the check-in day. For example, the fee applied if a reservation is canceled within 10 to 7 days before the check-in should be lower than the fee applied if a reservation is canceled within 6 to 1 days before the check-in.
Establishing connection
In order to start advertising on Expedia, you need to establish the connection with this sales channel. You can do this by adding it to the list of services in your account. Follow the below steps in order to get connected.
-
In Rentals United platform, go to the Services tab.
-
Click the Find Services tab.
- Type Expedia in the search box or scroll down through the list of available channels.
- Unfold Expedia section by clicking the Down arrow button.
-
Click the Get connected button.

-
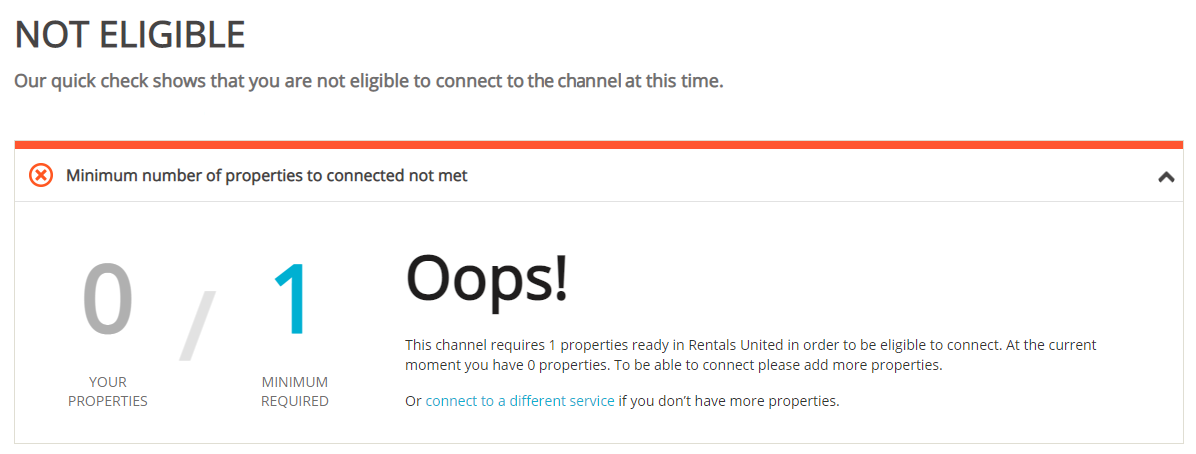
Your connection is now being validated in the background. If the validation is passed successfully, the Connection Wizard is launched and you can go to the next step. If you are not eligible to connect to Expedia, an error is displayed.
Eligibility errors indicate violating initial channel requirements that need to be met before you establish the connection. You will not be able to go to the next step and finish the connection process unless the eligibility error is cleared away. In order to resolve it, follow the instructions displayed on the screen. Please, see an exemplary eligibility error below.
-
You are presented with a brief description on how Expedia works. Read it carefully and confirm that you agree with it by ticking the checkbox below. Do not worry, once all the steps of the Connection Wizard are completed, you will still be able to view the How it works content again. Click the Save & Next button on the bottom of the page to move to the next step.
Tip: On the top of the page, you can view the progress of the Connection Wizard. Depending on the channel, the number of steps may differ. You can stop anywhere along the process. Upon next time you open the Connection Wizard, you will continue at the last completed step. - Follow the next steps displayed in Rentals United.
Create new listing
Follow the below procedure if you already have some properties created in Rentals United and you want to connect them to Expedia.
In Rentals United platform, open Property Settings. Follow the steps here.
-
Connect the property.
Depending on whether you already have some properties connected to Expedia or not, you are presented with two different options.
- Click
 if it is the first property to be connected.
 - Click
 if you already have some properties connected.
- Click
- A dialogue window appears with the question if the property is already published in Expedia.
- If the property is listed in Expedia, terminate the process and map your properties to Expedia listings.
- If the property is not listed in Expedia, click No.
-
Provide the required information and click Next.
Note: Different channels require different information to successfully identify your account:
- For Expedia it is PM Name.
If you cannot find this information in your agreement with the channel, please contact the channel directly.
-
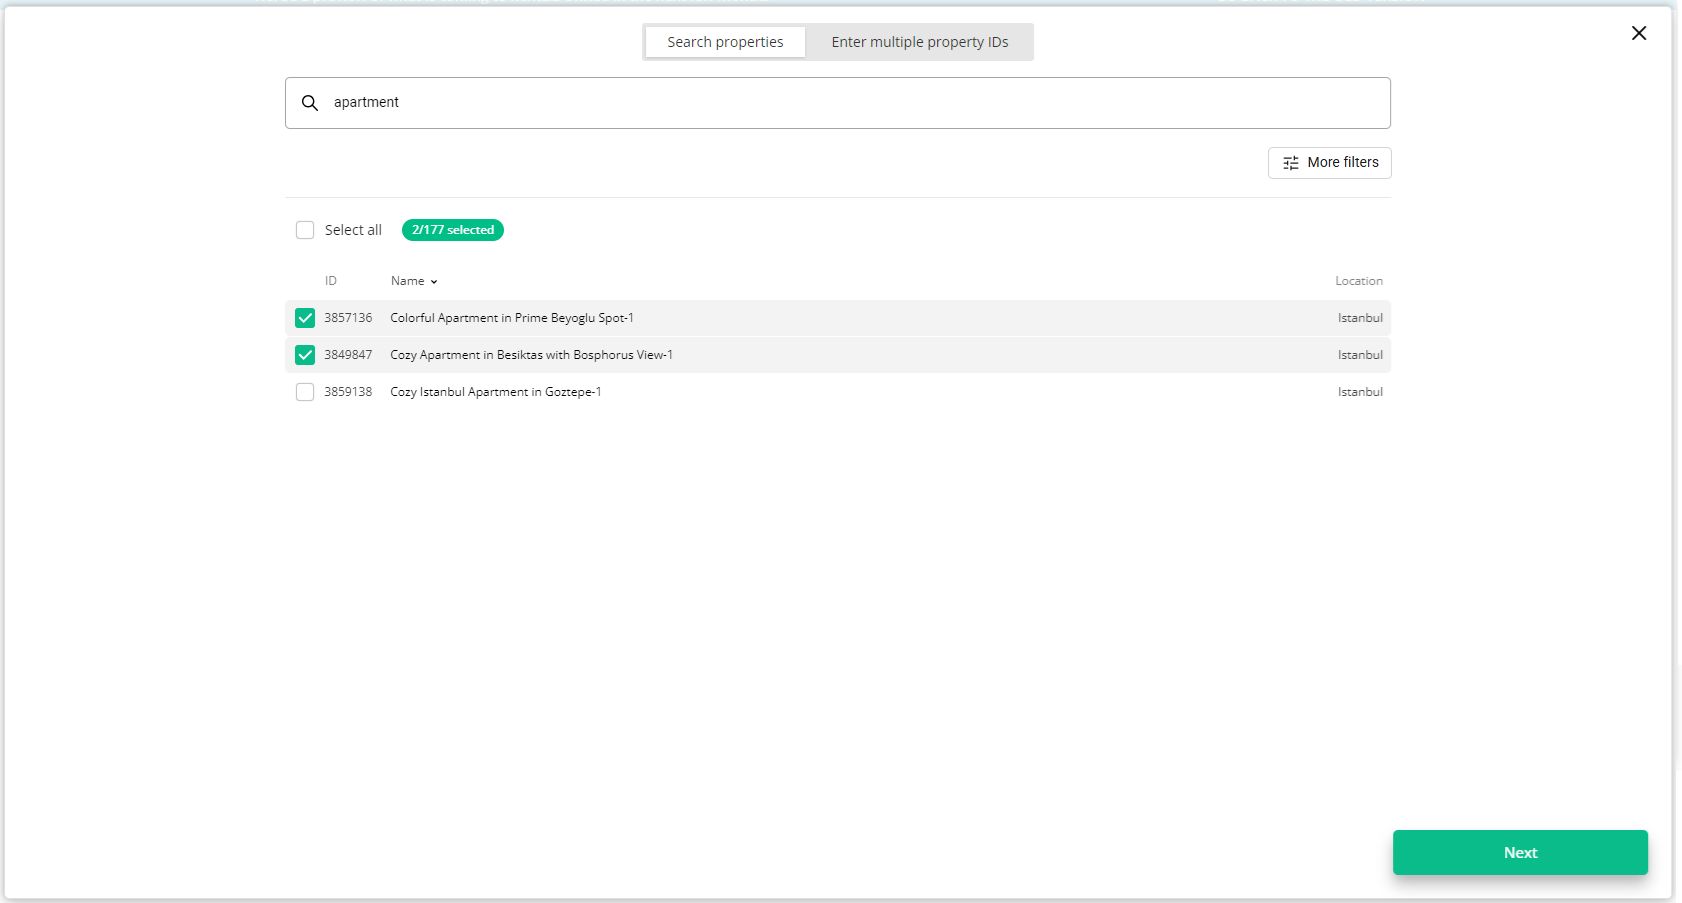
Choose the properties. You can read about the different ways of filtering and selecting properties here.
-
Click Next. You will see here the summary of all selected properties. Review the list and check if all properties are included.
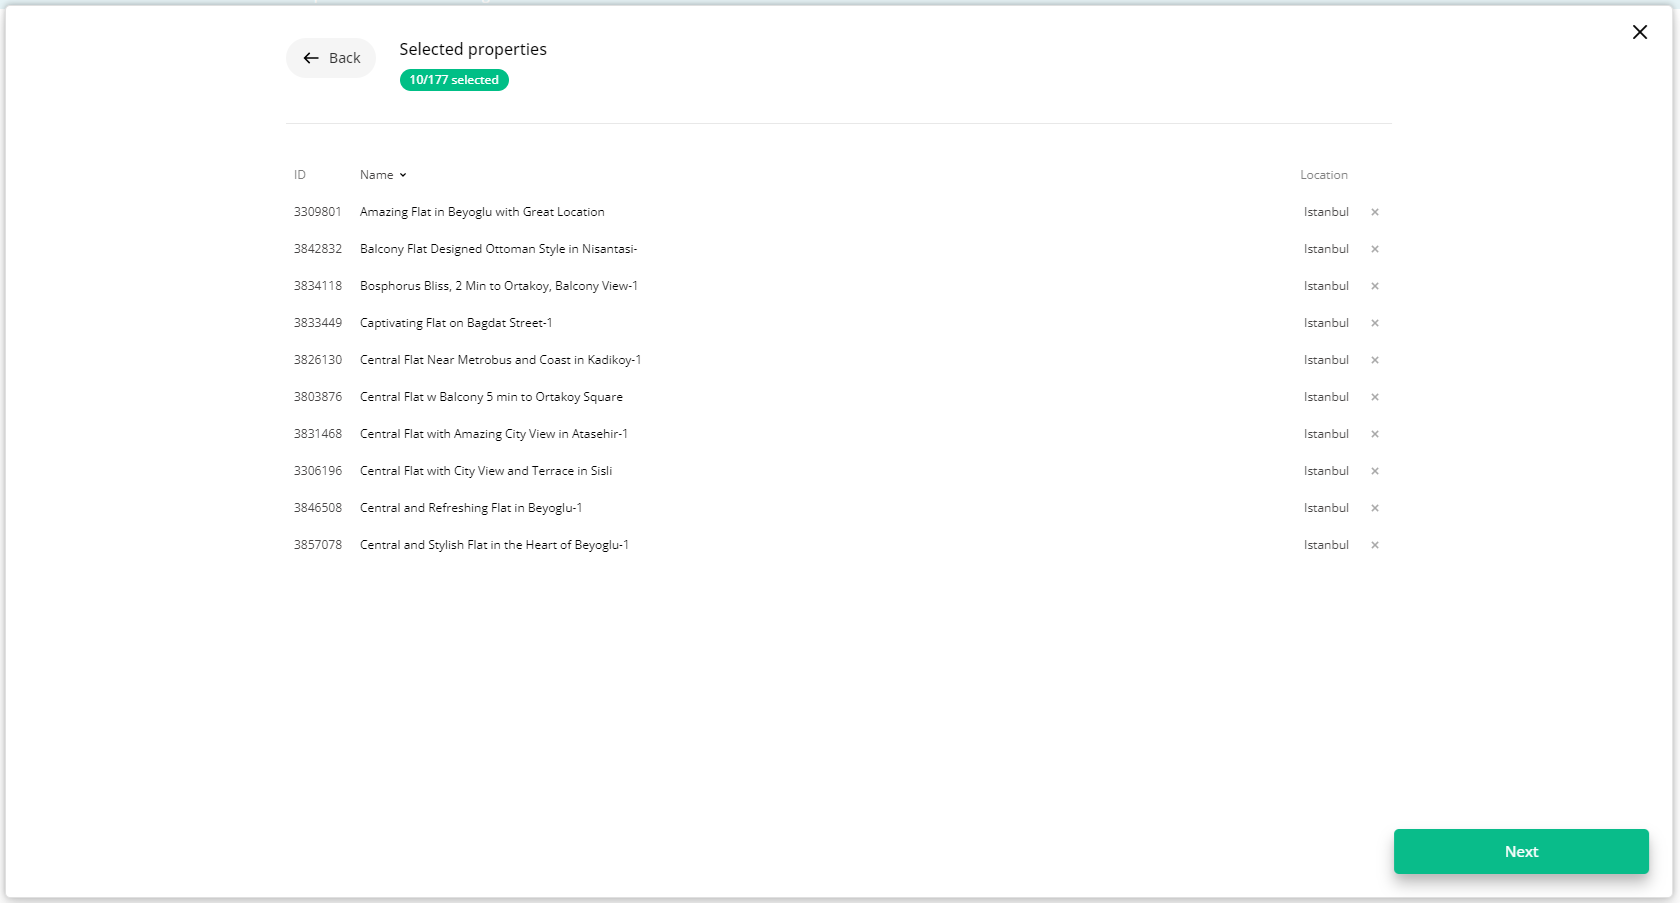
- Click Next to proceed.
- The content quality is analysed. The process should take up to a few minutes.
-
The summary of properties’ content is displayed.
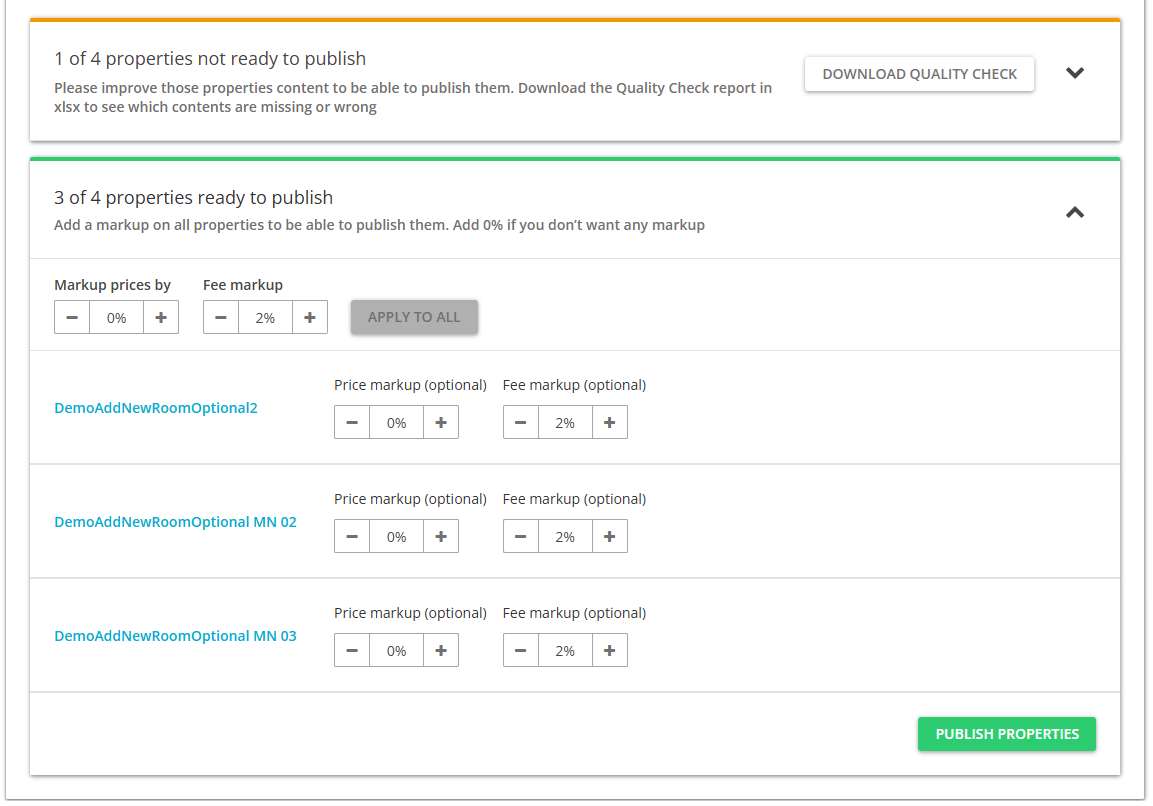 If some properties are not ready to publish, improve the content.
-
Check the content quality by unfolding the section with warning.
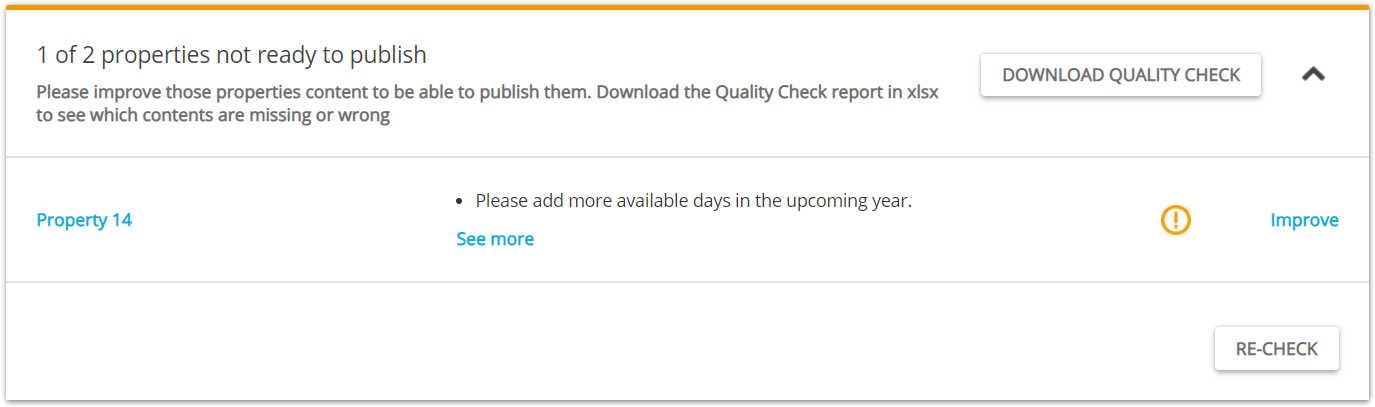
Verify if any data is missing or incorrect. It is possible to display the errors by unfolding the section. For more detailed summary of errors, download the XLSX report by clicking the Download Quality Check button.
- Click the Improve button. The Edit property page is opened in a new tab.
- Correct the content indicated in the report in the Edit property page.
-
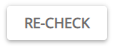
Go back to the Property List and click the Re-check button. If no further errors are displayed, the property is ready to publish.
-
-
If the properties are ready to publish, adjust the mark-up for each of your properties. You can additionally set up the booking mode for each property: Instant booking or Request to book. See here.
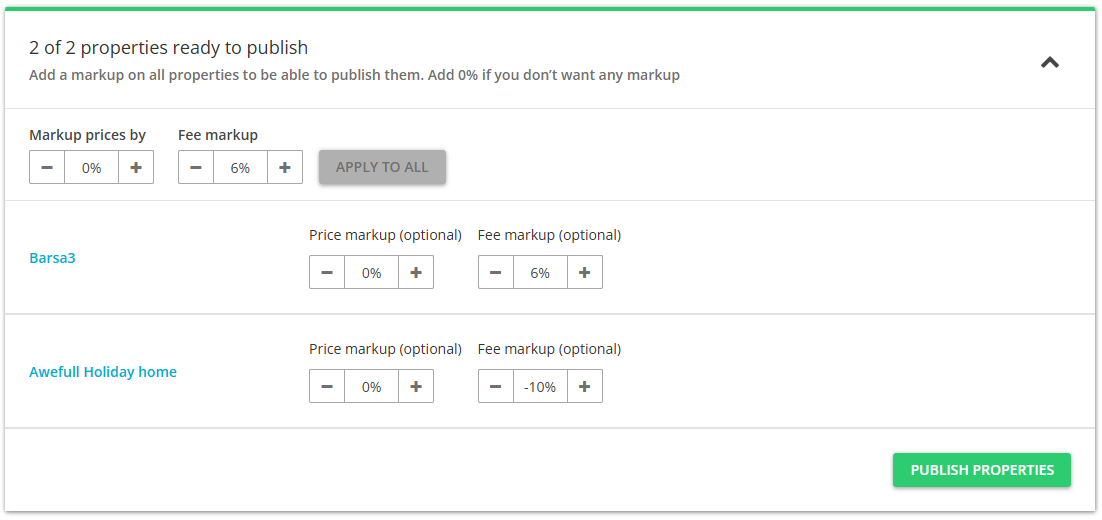
- Click the Publish properties button.
-
The published properties enter the
 Pending status.Tip: Each property created this way in Sales Channel will become a hotel with only one room type.
Setting Rentals United
In order to fully utilize the capabilities of Rentals United and make the linking of the two systems possible, you need to set Rentals United as the connectivity provider in Expedia. For example, this is required in order to enable mapping properties to the listings in the channel. Please, perform the following.
- Log in to the Expedia dashboard.
-
Go to the Rooms and Rates section.
-
Select Expedia Connectivity Settings from the Setup section.

- Select "Quick Connect" as the System Provider. Check both connectivity options available: Availability and rates as well as Booking retrieval.
- Make sure that the changes are saved.
Once the connection with Quick Connect is activated, you can start the connection process in Rentals United.
Mapping properties to existing listings
If you already have properties in Expedia and only want Rentals United to manage prices and availability, you may map properties between the two systems. Make sure that you have already established initial connection to Expedia channel - Setting Rentals United. Once the connection with Expedia is activated, you can start the mapping process in the Rentals United platform.
In Rentals United platform, open Property Settings. Follow the steps here.
-
Connect the property.
Depending on whether you already have some properties connected to Expedia or not, you are presented with two different options.
- Click if it is the first property to be connected.
- Click if you already have some properties connected.
- Click
- A dialogue window appears with the question if the property is already published in Expedia. Click Yes.
-
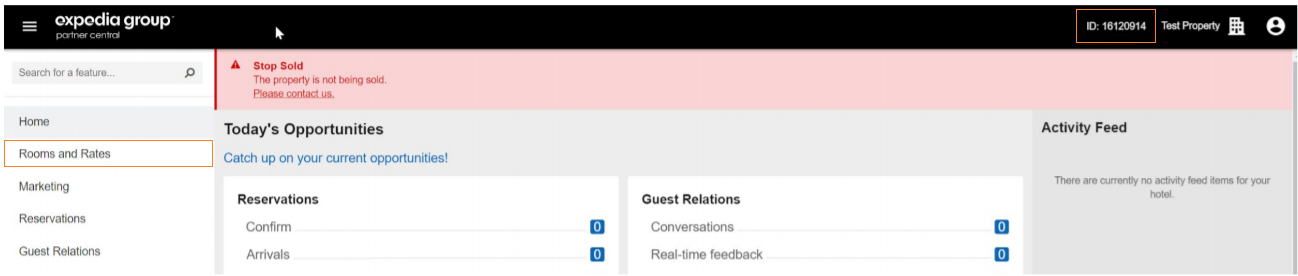
Provide the Hotel ID of the property you want to map. Then, click Next.
Hotel ID can be found in Expedia dashboard. If you are unable to find it, contact the Expedia Support Team.
-
Click the Connect this room button.

-
Select the properties you want to map to this room type. One or more properties may be mapped to one Expedia listing.
Tip: Multiple properties should be selected only if they share the same characteristics (amenities, photos, pricing etc.). If you do so, you will create a multi-unit group in Expedia. You can learn more on multi-unit groups here. - Click Next.
-
The summary is displayed. You can set the rate mark-up now.
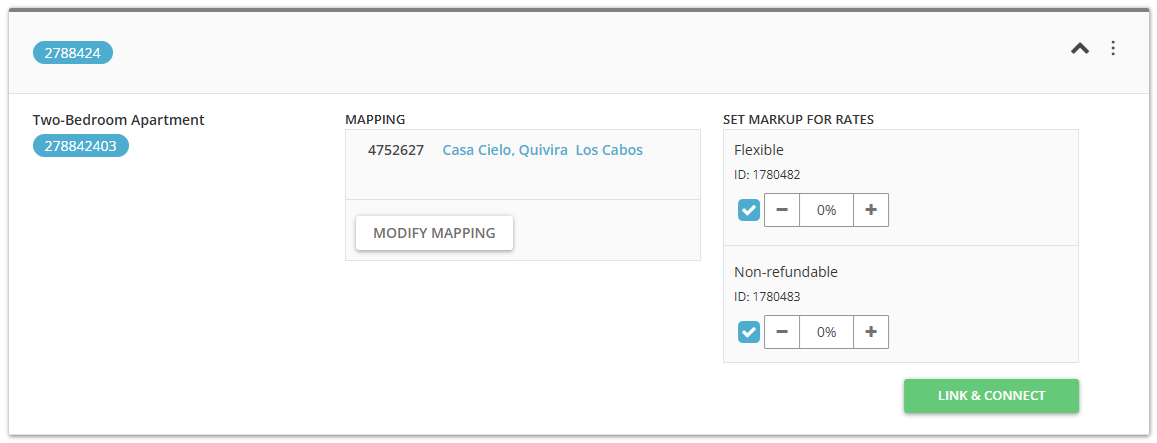
- Click the Connect property button.
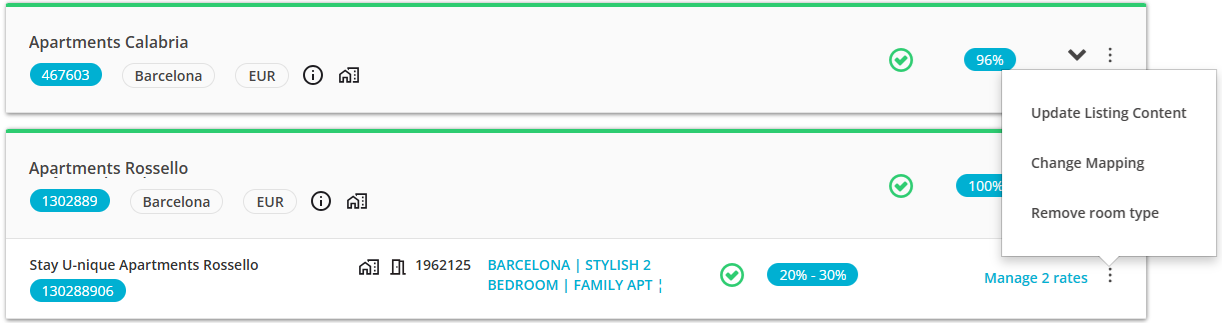
You can always add more properties under a particular room type. To do this, click the three-dot menu and select the Change mapping option.
Note: Due to a strong Expedia policy to prevent duplicates, it is not possible to re-create the property's connection with the channel (archive and connect again). Archiving a property does not resolve this, as the connection between Rentals United and Expedia is still maintained in the background.
Main property for hotel/room type
Selecting the main property for hotel and room type gives you more control over your rental offer in Expedia. You provide the guest with more detailed information about the booked listing and set realistic expectations. Your guest receives accurate details and is given the opportunity to select the best-fitted room type, which results in higher satisfaction and better experience.
- Clear source of information for hotel / room type
- Avoid confusion when updating hotel / main room types content
- Transparency when organising property content
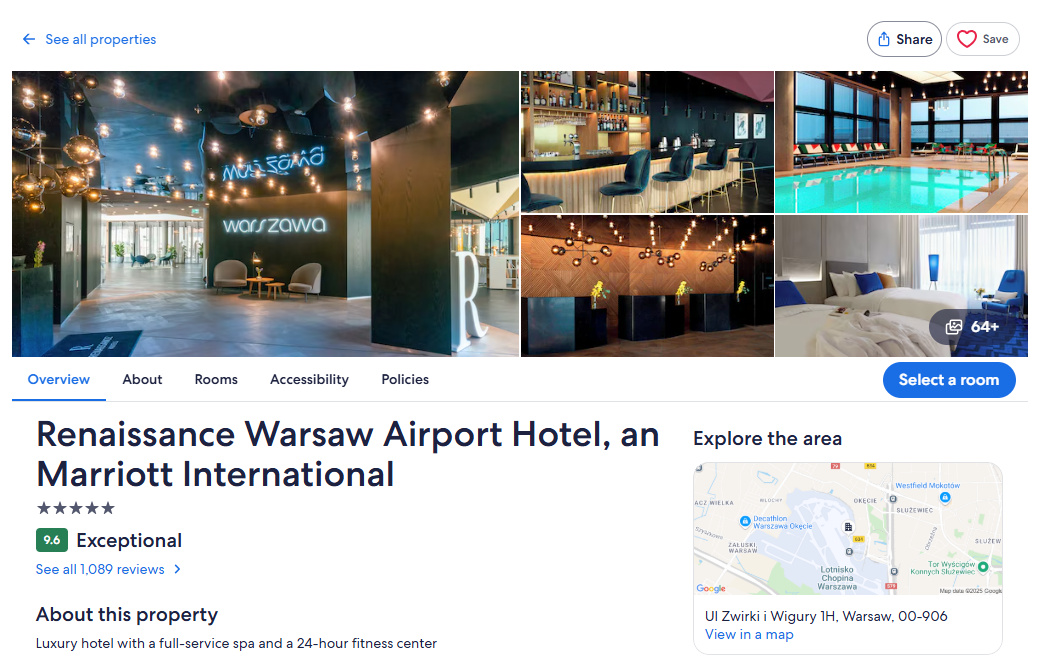
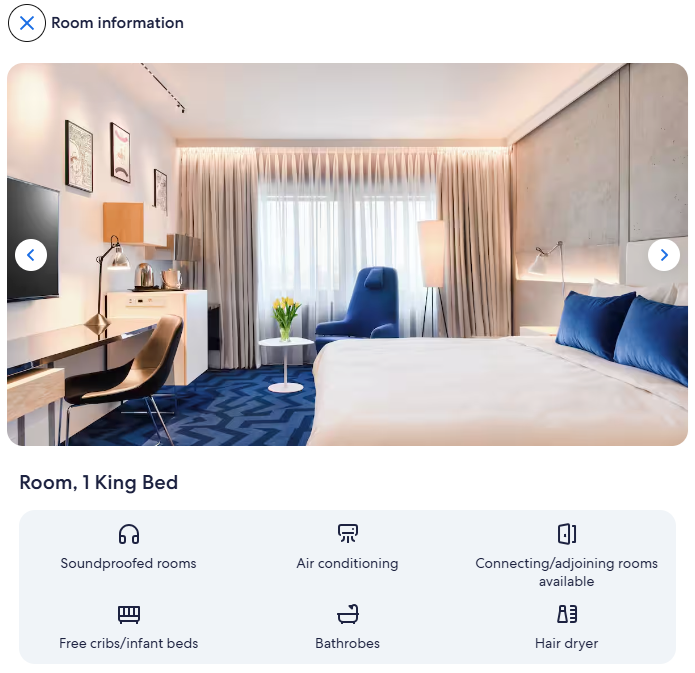
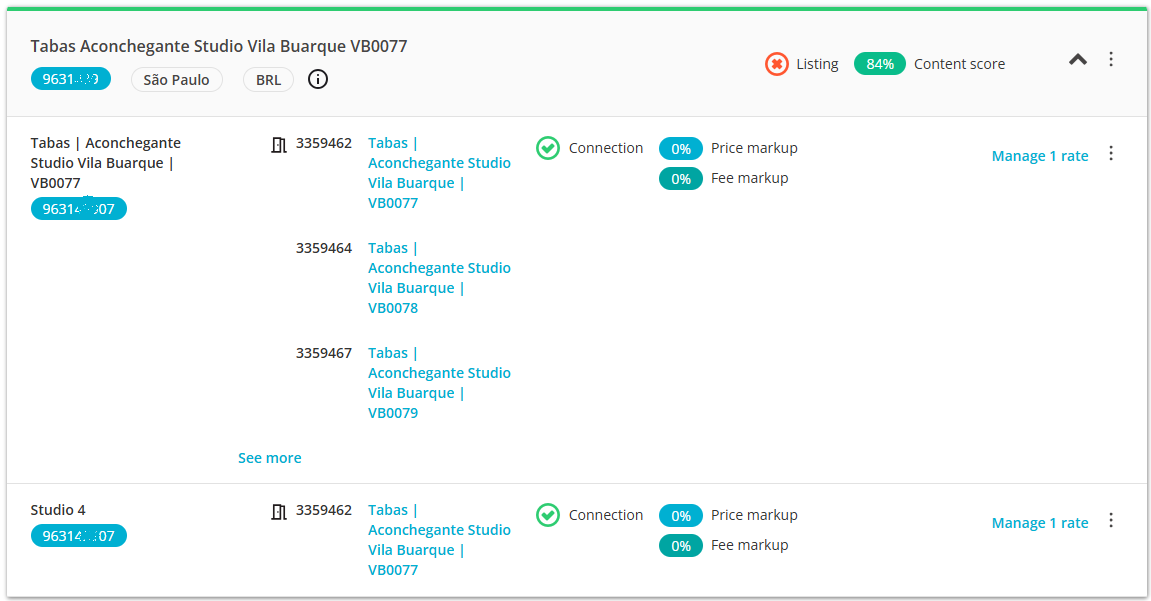
Main property for a hotel will be displayed in the search results and as the main listing page. See the exemplary listing page here
Main property for the room type will be displayed upon selecting a specific room type from the accommodation type section. See here.
Notes
- When creating new connections, the first property added to a connection is marked as main by default
- If you have a hotel with only one room type and this room type is mapped to only one property, then this property will be selected as main property for the hotel and the room type by default
- The same property can be selected as main for both the hotel and room type
- Selecting a main property for a hotel and a room type is mandatory. Not having a main property selected will not allow you to update the listing content. You can filter out the connections that do not have the main property selected.
Select main property for hotel
-
Hover over the three-dot menu on the cluster level. Choose Select main property for this hotel.
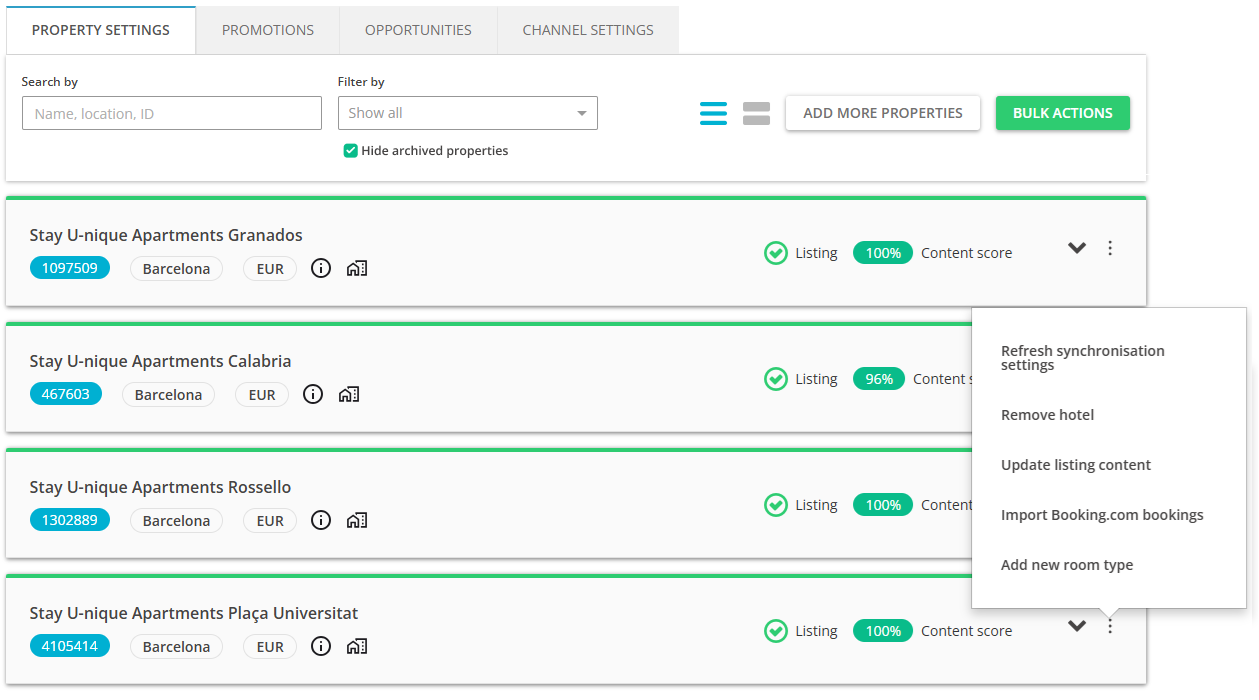
- Select the property from the dropdown list and click Save changes.
- The main property icon
 is assigned to the property selected as main for the hotel.
Select main property for room type
-
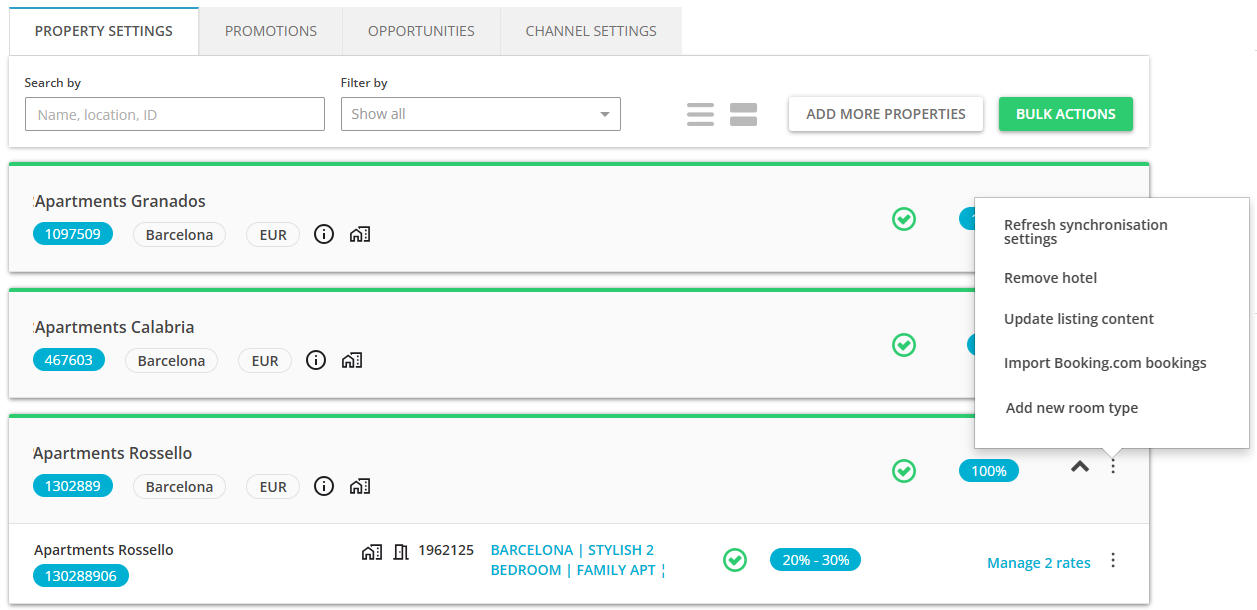
Hover over the three-dot menu on the property level. Choose Select main property for this room type.

- Select the property from the dropdown list and click Save changes.
- The main property icon
 is assigned to the property selected as main for the room type.
Add new room type
Adding a new room type allows you to extend your offer to better target your guests’ needs. For example, you have been renting only 2-bedroom apartments in your hotel, but you decided to offer a Studio room type, as well. You can add a new room type directly in Rentals United, so that your guests in Expedia can choose from two room types:
- 2-bedroom apartment
- Studio
-
Hover over the three-dot menu on the cluster level. Choose Add new room type.
-
From the property list, select the main property for your new room type. We will use this property’s data (descriptions, prices) to fill out information about your new room type. Only one property can be selected as main.

- In the Main property section, you can preview the property that you selected as Main in the previous step.
- Add more properties to this room type by clicking + I want to link more properties. You should add here as many properties as you want to rent as this specific room type. This way you will maximise availability and the booking opportunities. Click Next to move forward.
-
Click Add a new rate to this room. Add a new rate plan to this room type by adding a new rate plan or selecting one from the list of rate plans.
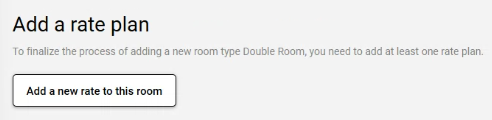
- Click Create room type to confirm.
-
After you successfully add a rate plan to your room type, it gets updated on Expedia extranet and the guests can book this room type immediately.
Updating listings
If you make changes to your property's content, e.g. update descriptions or photos, you need to remember to update the listing, too. If you do not update the listing - your recent changes will not be visible on the sales channel and the listing will display outdated information.
Remember that price and availability (ARI) updates are handled automatically and there is no need to update the listing if you change e.g. prices. The details that require updating the listing are static data updates and these include descriptions, photos, property data, fees and taxes and more. For details, see here.
For Expedia, updates are supported for the following configurations:
- One hotel - one room type - one rate plan
- One hotel - one room type - multiple rate plans
- One hotel - multiple room types - one rate plan
- One hotel - multiple room types - multiple rate plans
Listing content updates are sourced on the main property selected for a hotel and/or room type. You have multiple update options to choose from.
On the hotel level:
- Hotel:
- Entire content for hotel
- Selected content areas for hotel
- Hotel and all room types:
- Entire content for hotel and all room types
- Selected content areas for hotel and all room types
On the room type level:
- Entire content for the room type
- Selected content areas for the room type
Before you start
Make sure that the entity you want to update (hotel and/or room type) has the main property selected. Otherwise, you will be prompted to do so.
Update listing content for hotel
-
Hover over the three-dot menu on the cluster level. Choose Update listing content.
-
Select one from the update options.
- Update content only for this hotel - only the hotel listing will be updated
- Update the entire content (full update)
- Update only selected content areas (partial update)
- Update content for this hotel and all room types - the hotel listing will be updated as well as all room type listings in this hotel
- Update the entire content (full update)
- Update only selected content areas (partial update)
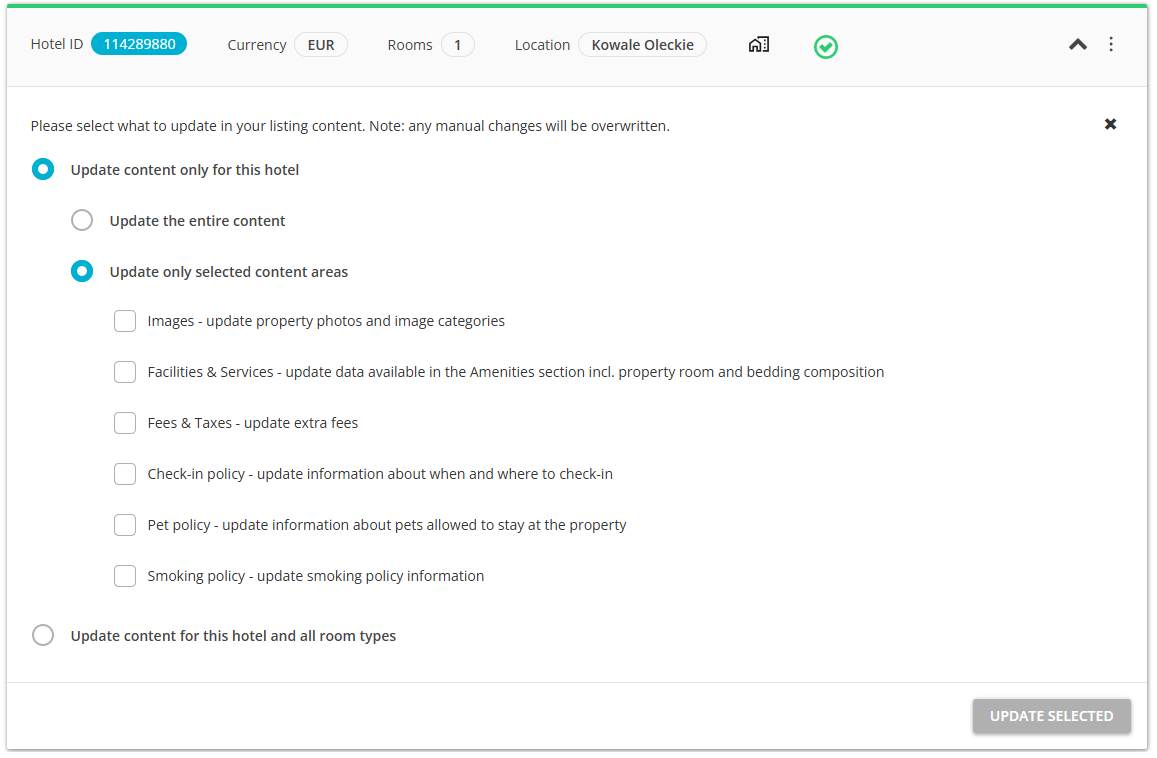
If you want to perform a full update, select Update the entire content. If you select this option and have additional content for this property in sales channel extranet, then it may be overwritten. If you manage your property content solely in Rentals United, then you can safely use it.
If you want to update only selected areas, select Update only selected areas. Then, select the areas that you wish to update. For example, if you changed the photos of your property, you should select Images. It is the safest option to use on a daily basis, as it overrides the selected area only.
- Update content only for this hotel - only the hotel listing will be updated
- Click Update selected. The update is scheduled and the listing should be updated within approximately 30 minutes.
Update listing content for room type
-
Hover over the three-dot menu on the room type level. Choose Update listing content.
-
Select one from the update options.
- If you want to update all available areas (full update) for the room type listing, select Update the entire content for this room type.
- If you want to update only selected areas (partial update) for the room type listing, select Update only selected areas for this room type. Then, select the areas that you wish to update.
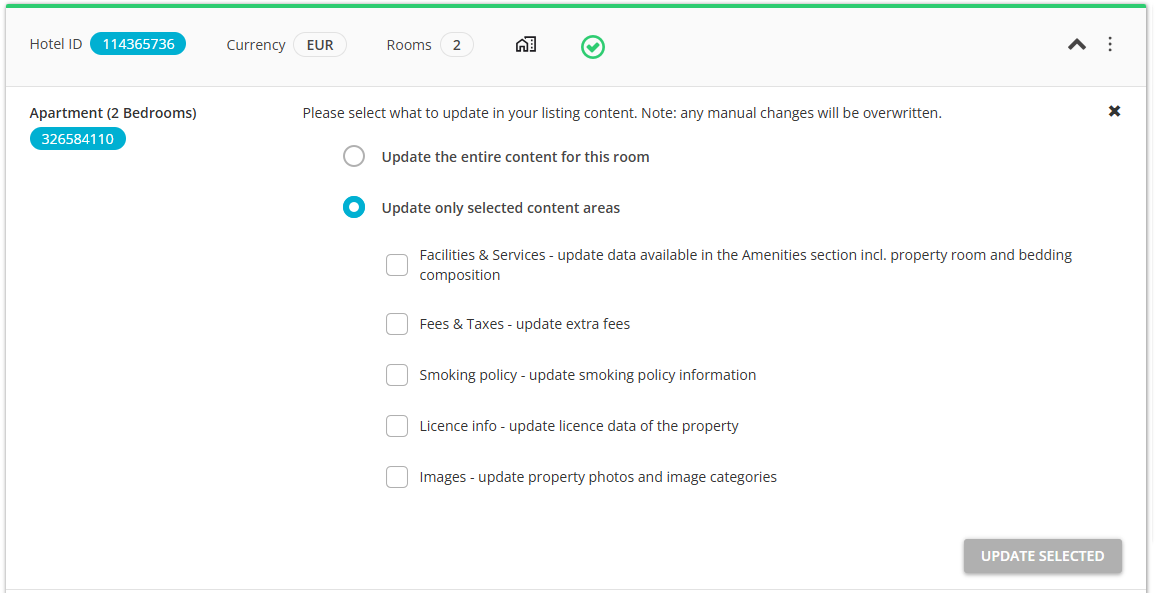
- Click Update selected. The update is scheduled and the listing should be updated within approximately 30 minutes.
Refreshing the synchronization settings
If you make any changes in the channel or notice any discrepancies between how your properties are displayed in the channel dashboard and in Rentals United, you may want to refresh the view. This action will update your inventory in Rentals United and show you the most up-to-date set-up.
In Rentals United platform, open Property Settings. Follow the steps here.
-
Choose the hotel you would like to refresh the inventory set-up for and hover over the three dot menu. All room types and rates in this hotel will be refreshed.
Note: Use the three dot menu of the hotel, not room. - Confirm the process by clicking the Proceed button.
- Rentals United retrieves the configuration of rates from the channel.
- if there are more rates in the channel, then the new rates are created in Rentals United and mapped to the corresponding ones; the newly created rates enter the inactive state
- any rates that do not have any corresponding channel rates are removed from Rentals United
- rates for which configuration has not changed remain intact
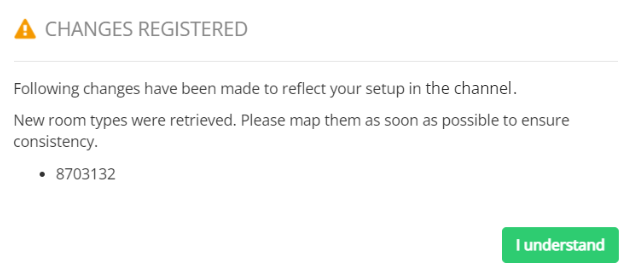
-
After the changes are made, a pop-up with the summary of changes is displayed. Click the I understand button.
Tip: If you do not want to refresh the set-up of a hotel (all room types and rates), you may as well refresh the rates of an individual room type only. In this case, select the hotel and click the Manage rates button. The list of available rates is opened. Click the Refresh rate info button. The process follows as above.
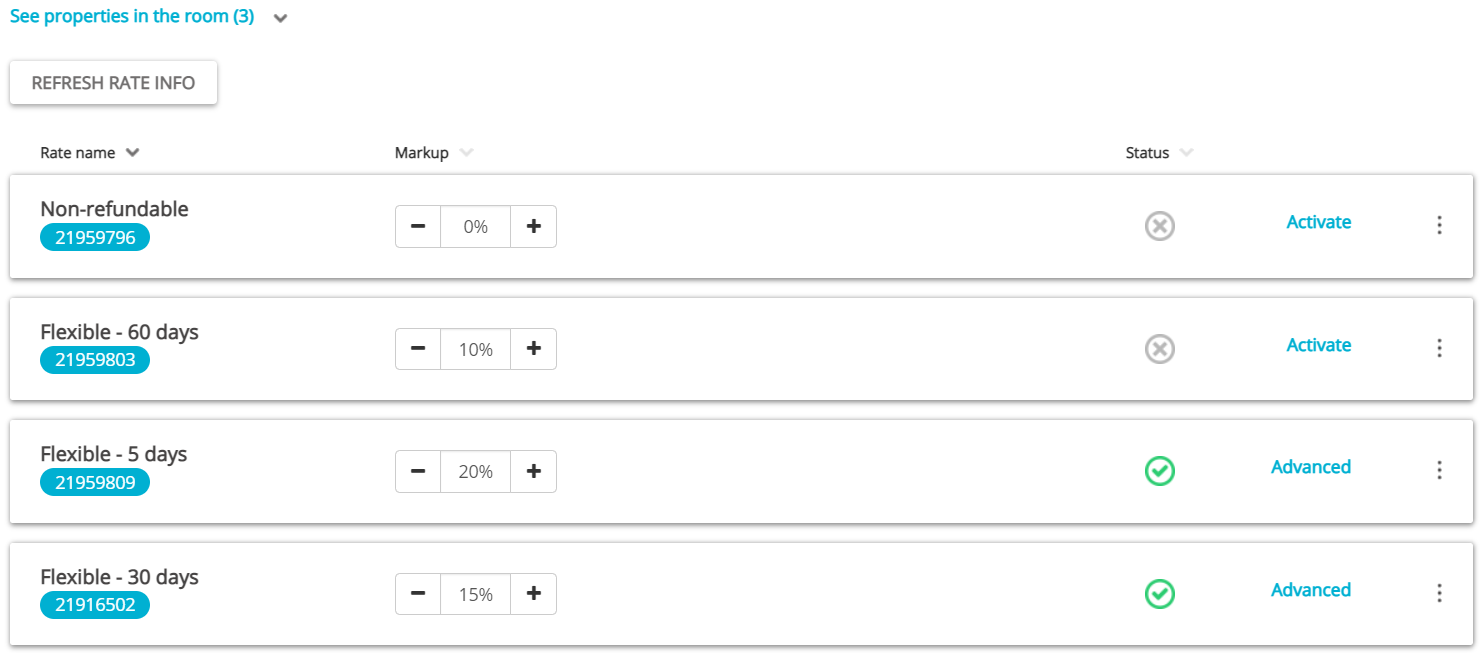
Manage / Manage rates
When adding a property to Expedia, we create only 1 standalone rate plan by default. If you want to diversify your offer, you can create additional rate plans in Rentals United and they will be automatically created in Expedia.
During the mapping of an Expedia listing to a Rentals United property, all existing rate plans are imported to Rentals United. You will be able to see and edit them directly in Rentals United. Some plans will be available in the read-only mode.
See how to create and manage rates here.
Removing hotels and room types from Property Settings
If you have some properties that are no longer listed in Expedia, but still appear in Property Settings in Rentals United and pollute your view, you may remove them from Property Settings. After deactivating the hotel or room type in Expedia, just use the Remove options available in Property Settings to make the property list in Property Settings identical in Expedia and Rentals United. There are two options available now:
- Remove the whole hotel
- Remove room type
Note, however, that these options can be used only to remove the hotels and room types from the Property Settings list. They do not stop your properties from being rented on Expedia website.
In Rentals United platform, open Property Settings. Follow the steps here.
- Search for the property you want to remove by scrolling down or filtering the property out.
- Once found, decide whether you want to remove the entire hotel or particular room types only. Make sure that you have already removed the same properties in Expedia dashboard.
-
If you want to remove the whole hotel, hover over the three-dot menu on top of the cluster and select the Remove hotel option. Hotels stuck in the Pending state can be deleted from the Property Settings, too.
-
If you want to remove specific room type only, unfold the hotel cluster and hover over the three-dot menu next to the room type to be removed. Click the Remove room type option.
-
-
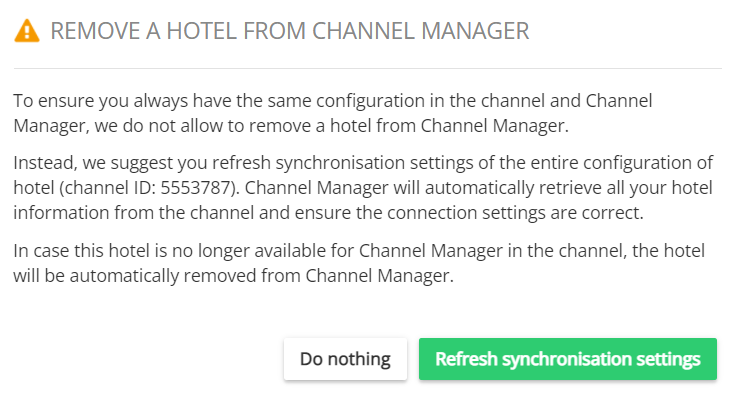
A notification is displayed. Click the Refresh synchronization settings button to confirm.
-
If you wanted to remove an entire hotel, the following notification is displayed:
-
If you wanted to remove a room type, the following notification is displayed:
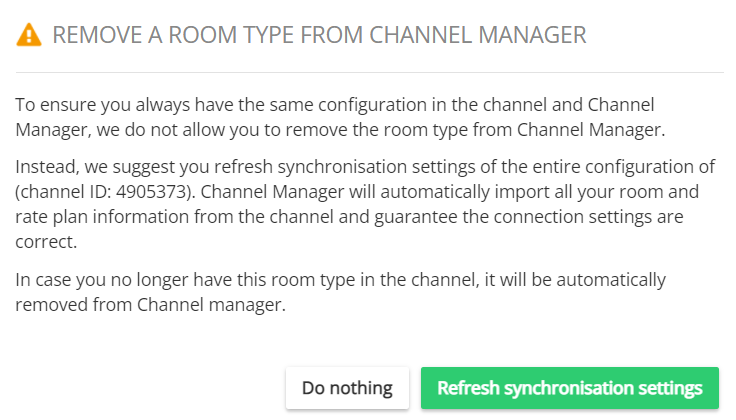
Note: The Remove option will usually point you to refresh the property set-up in order to maintain synchronization with Expedia. Hence, make sure to remove the hotel or room type in Expedia dashboard before attempting to remove it in Rentals United. If you need more information how to proceed with hotel or room deletion in Expedia, you may want to contact the Expedia Support Team directly and request detailed instructions. -
- Confirm the process by clicking the Confirm button.
- The summary of changes is displayed. If you removed the hotel or room type correctly in Expedia, you should see this change in the pop-up.
Check listing status
Now you can check what status your listing has in Expedia and quickly identify potential connection issues.
The status is displayed on the hotel (cluster) level and contains the listing status and the last status check timestamp. The status gets updated every day, but you can also refresh the status manually. You will see two statuses possible:
- Active - indicates that the hotel is active and bookable on Expedia website
- Inactive - indicates that there is a connection error which affects the connection. In this case, you should check the errors on the room (property) level and follow the steps described in the error message to clear them away.
How to check and refresh the listing status
- In Rentals United, open Expedia Property Settings.
-
On the cluster level, you will see a new status icon.
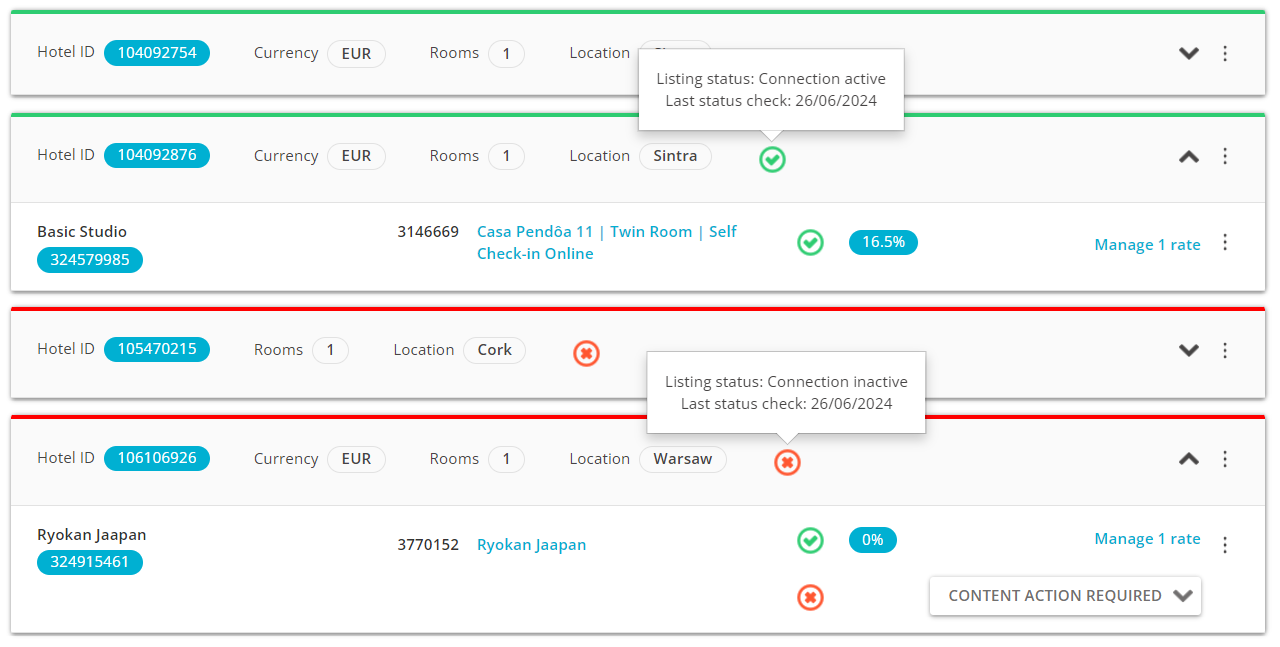
- Hover over it and you will see the details of this status
- Hover over the three-dot menu and select Refresh listing status to fetch the latest listing status from Expedia. The listing status and the timestamp will update.
